

Why Kubernetes?
Let's go back in time to when docker was the main thing that people used to use to containerize their applications but it had a few cons, which are
Not many containers at the same time?
How can we monitor them?
What about running pods on multiple nodes?
Flexibility?
Autoscaling?
Scheduling?
Auto-healing?
So to overcome these issues, Kubernetes came into the picture.
What is Kubernetes?
In short, we can say that:
Kubernetes, also known as K8s, is an open-source system for automating the deployment, scaling, and management of containerized applications.
What problems do K8s solve?
Scalability: Docker facilitates containerization but lacks built-in features for seamless scalability. Kubernetes automates deployment and scaling, ensuring applications can efficiently run across clusters of containers and managing the complexity of distributing workloads.
Monitoring: Kubernetes integrates with monitoring and logging solutions like Prometheus and Grafana, enabling efficient data collection, health monitoring, and performance analysis of containerized applications.
Multi-Node Deployment: Kubernetes enables running pods (groups of containers) across multiple nodes, distributing the load and ensuring high availability and fault tolerance.
Flexibility: Kubernetes offers flexibility by supporting various container runtimes, enabling you to choose the most suitable one for your applications. It is not limited to Docker and can work with containers and other container runtimes.
Autoscaling: Kubernetes provides autoscaling capabilities, automatically adjusting the number of running replicas based on resource utilization or custom metrics, ensuring optimal performance during high-demand periods.
Scheduling: Kubernetes schedules pods and containers across the cluster based on resource requirements and constraints, optimizing resource utilization and enhancing application performance.
Auto-healing: Kubernetes constantly monitors the health of applications and can automatically restart failed containers or reschedule them on healthy nodes to maintain the desired application state.
Kubernetes Architecture
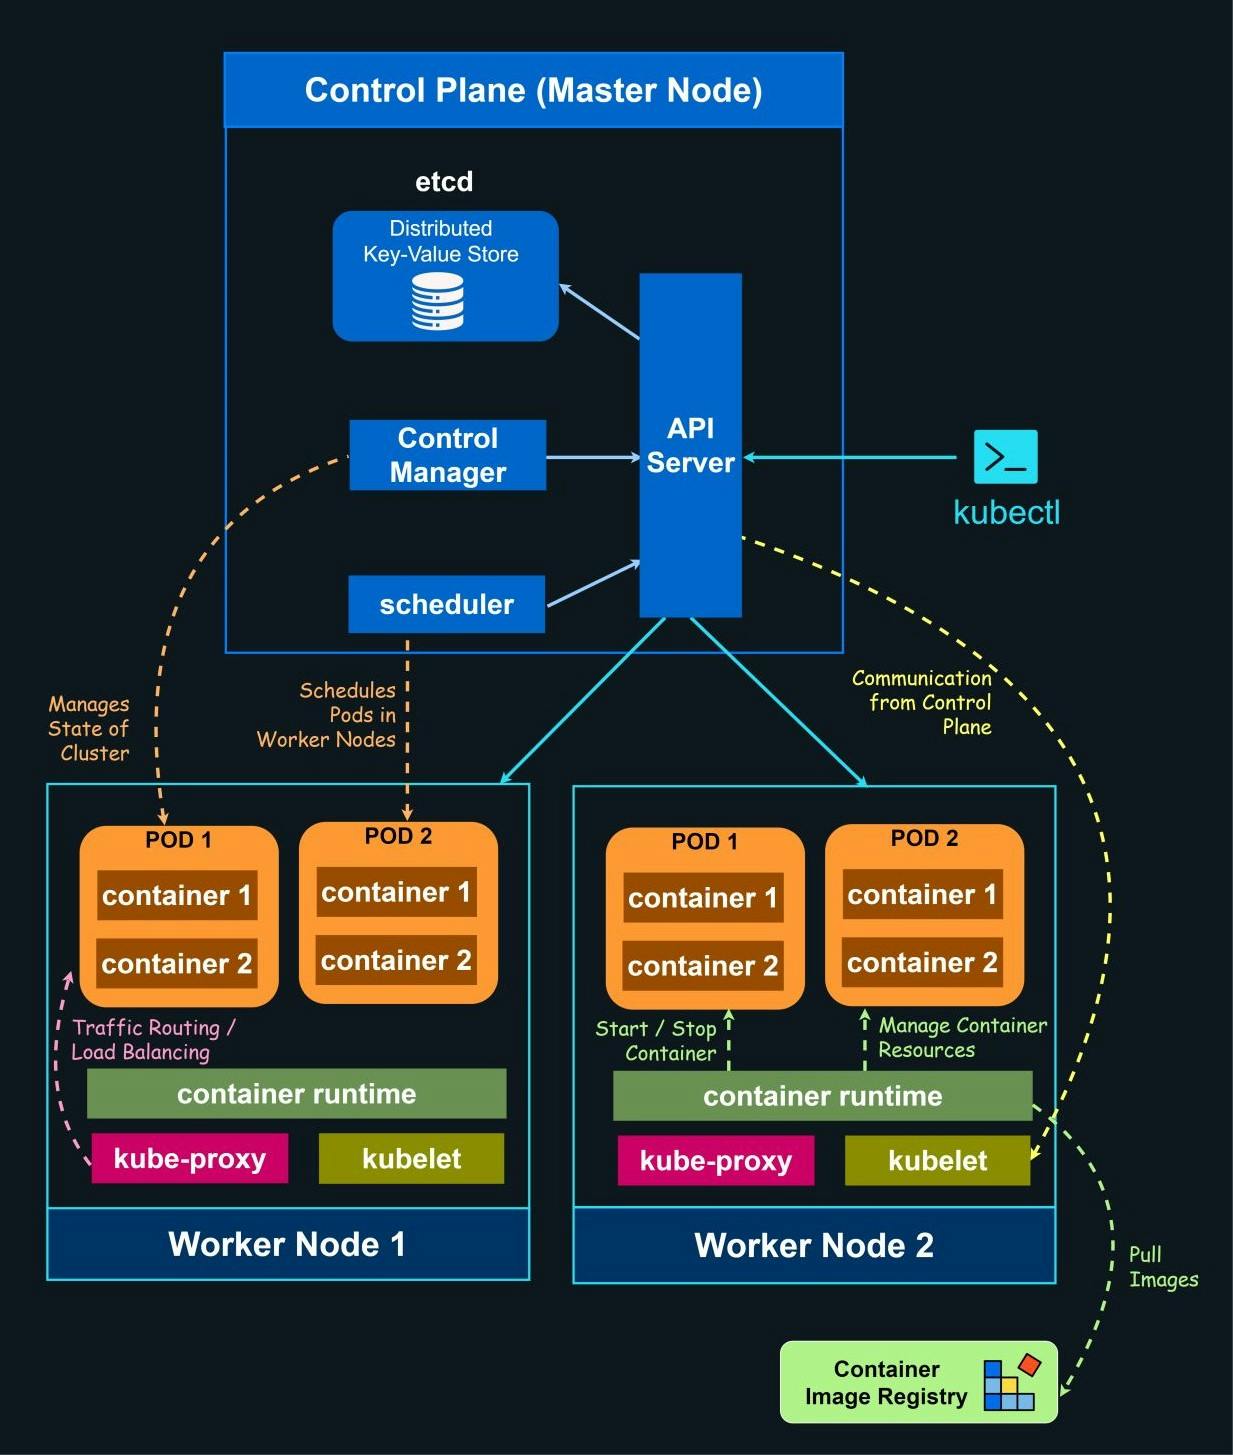
We can see the Kubernetes Architecture in the above image.
Let us go through the Kubernetes Architecture:
Control Plane Node
Firstly, I give a command to my terminal (given below). This line commands the Kubernetes API Server to run the image named 'nginx'.
The API Server has the ability to authorize, authenticate, and submit the incoming request from the user.
Scheduler: This is the smartest element of Kubernetes. It helps to find the best-fit node to run the pod based on tolerances, affinity, and the node selector. It also updates the pod specification with the node.
ETCD: It is the key-value store for distributed systems. We will understand more about ETCD later (during the hands-on).
Control Manager: When we want to make replicas of a pod, e.g., 5 replicas, We make a different object that will be controlled by the control manager. You can imagine the role of the control manager such that, for example, when there are five replicas of a pod and one goes down, the control manager alerts the API Server to create another pod that can replace the one that was down.
CCM: The CCM, or Cloud Controller Manager, is responsible for communication between the cloud provider and the Kubernetes Cluster. It is different for different cloud providers.
Worker Node
The worker node consists of many small components, such as Kubelet, Kube-Proxy, pods, and contained. Let's understand these components in a smart way.
Kubelet: Kubelet always asks the API server, If it has anything to run.
When the user gives a command to run, the scheduler gives the provided information on how and where the pod should run (i.e., the best node to run a particular pod), and the API server tells the particular node to run the pod with the given specs. It will run the given pod through the CRI (container runtime interface) (here containerd is the CRI).
Kube-Proxy: It maintains the network rules on the nodes. These network rules help them communicate between the pods inside or outside the cluster.
They basically have the IP tables of the pods, and every time a pod is created, the IP tables are handled by Kube Proxy.ContainerD: It is the runtime interface of the worker node. It consists of three main terminologies: CRI (Container Runtime Interface), CNI (Container Network Interface), and CSI (Container Storage Interface).
Pods: This is our application.
Prerequisites:
YAML (YAML ain't a markup language)
You can learn the basics of YAML through this video:Install Kubectl and Minikube on your local machine.
You can find it in the Kubernetes Blog :
Kubectl
Minikube
That's it for the first blog! Don't forget to stay tuned for more, where we'll explore the prerequisites for Kubernetes. Thank you for reading, and I look forward to sharing more insights with you soon.